Metallic Epoxy Tips and Techniques
Metallic floor coatings are a very exotic-looking flooring option. Unlike with solid-color pigment or chips, no two metallic floors are alike.

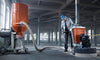
Epoxystarz™by PowerCoat Industries ™ COMMERCIAL CENTER
These floors utilize a clear epoxy or polyaspartic base, and the translucent floors are colored by whatever metallic powder is being used. These coatings create a glossy and deep-looking floor that can contain a variety of colors and visual effects. Some even have a beautiful three-dimensional appearance that gives the illusion of craters, ripples, and swirling rivers of metallic-looking plasma.
In metallic epoxies, metallic mica pigments are dispersed in a variety of binders to create seamless floors. These floors are perfect for retail establishments, nightclubs, automotive showrooms, residential interiors and garage floors.
As beautiful and stunning as these floors look, the high-performance epoxy or polyurethane resin and a very high solids count make them exceptionally durable too. They are just as resistant to oil, salt, chemicals, acids, water and wear as any other high-performance epoxy floors.
Maintenance is easy, and the amount of light they reflect is outstanding due to the glossy nature of the surface. Like any other epoxy coating, they can be a little slippery when wet.
I specialize in installing metallic floors. These jobs are tricky and take skills and creativity. Over time I have developed many different effects and techniques for working with metallics. Here are just a few.
There are several ways to apply metallics. The most effective way is pouring lines out of a bucket or using a watering pot for more control of the pour so nothing goes to waste. Once the coating is out on the floor, a squeegee trowel is the best way to spread it.

Epoxystarz™by PowerCoat Industries ™ CAR DEALER SHOW ROOM
In my professional opinion, the use of a minimum of two colors is much better than a single color. Just remember to pour out each color in an opposite direction. Never merely pour one color on top of another.
For a more extreme, exotic look, squeegee or roll out a single color, then apply another color the “dipping and shaking” way with a brush, a stir stick, etc. Once the colors are down you can use a roller or a squeegee trowel to move the colors around or you can just leave it alone. (In this case, do not try to swirl your colors.)
You can also do a one-stroke backroll. This will give you an acid stain look. You never want to get caught up in overrolling your backroll, as that will blend your colors too much and you will go from multiple colors to just one color that was created from the overrolling or squeegee.
After your product gets tacky, you can apply numerous kinds of solvents, such as MEK (methyl ethyl ketone), xylene, denatured alcohol and isopropyl alcohol. Different types of solvents will provide you with different effects and looks. This is something that you as an installer will have to play with.
If you want the crater ripple effects and use a spray bottle to apply the solvent, all of your craters will look the same size. I prefer to pour my solvent into a open 1-gallon bucket and use my hands to scoop it out and flick it onto the floor — actually, more like splash it on. I go crazy with my solvents, but you need to be careful you don’t overflood the floor because you will lose your effects.
The best recommendation I can give is to not be scared. You will not mess up the floor at all. There is no wrong or right method. Metallic floors are unique in their own way and a metallic floor is never wrong. One might not look as good as the other, but that is where the creativity comes in.